Your Birdbuddy has arrived! Hooray! 🎉
We are so excited for you to get started and use your Birdbuddy, so let’s get you set up for success! Follow along below for an easy, step-by-step guide to everything you need to know, and start thinking about the perfect spot to place your feeder in the meantime.
Step 1: Download the App
First, download our Birdbuddy: ID & Collect Birds app; it will help you get started. We also have tons of tips, and we’re always here to be your “wing buddy” every step of the way.
Step 2: Create an Account
Now, you’ll want to pair your camera module with the app on your mobile device via Bluetooth and connect it to your Wi-Fi network. Please note that pairing is done entirely through the Birdbuddy app and not directly through Bluetooth settings on your mobile device.
If you have your own Birdbuddy device, select the "Start with a new Birdbuddy" option. Before you can continue to pair your camera, you'll need to set up an account if you don't already have one.
You have the option to create a unique Birdbuddy account using your email address or use available third-party sign-in options (Apple, Google, and Facebook, depending on your device) and create an account that way.
Once you sign in, the app will guide you through the Bluetooth and Wi-Fi pairing process.
The app will ask you which device you're pairing: the Nature Cam or the Birdbuddy 2. Select the device and press Continue.
If it can find the device on its own, it will let you know, and you can just press Connect.
For instructions specific to the camera module type, jump to the appropriate section below:
Nature Cam (Pro)
Step 3: Charge First (and then unplug before continuing)
Start by removing the cap from the USB charging port located on the top to reveal the USB port and charging the camera module for 2-4 hours using the USB-C to USB-C cable.
Note that the charging indicator light may not illuminate immediately. Please allow some time for the device to start charging.
During the initial charging phase, you may also observe a brief green light followed immediately by a faint blinking blue light. This indicates that the device has immediately entered Bluetooth pairing mode.
Once you have confirmed a blinking blue LED, you can continue the in-app pairing process.
First, you'll be prompted to pair via Bluetooth. Select Pair when you get the Bluetooth pairing request:
Then, select your Wi-Fi network and enter your Wi-Fi password. If the network is selected automatically, just put in the Wi-Fi password:
👉 Connectivity and Connection Requirements
👉 The In-App Pairing Process Step-by-Step Guide
⚠️ Troubleshooting
Step 4: Live stream test
After successfully connecting to Wi-Fi, you will have the option to send an invite code to share the postcards your camera makes. Once this is completed or skipped, you will be directed to the Birdbuddy Live feature. Here, you can test the live stream even if the camera is not in its housing. If you find that the stream is not loading, please try reloading it.
Additionally, consult this article to see if your network settings might be interfering with the camera's functionality.
NOTE: Sound is not enabled on the live stream, even if you have sound recording turned on in the feeder settings. Only video postcards have sound.
Step 5: Place the Camera into the housing and take it outside
Once the camera module is paired and updated, you can place the camera into the feeder (if you have a Birdbuddy 2, you have already done so at step 3). You can check the live stream again to see if you're happy with the view.
Step 6: Fill Your Feeder!
Fill your feeder with seed. There are plenty of different varieties of seeds you can use, but we have some recommendations you can check out, too.
Step 7: Feeding Time!
Now it’s time to wait for some bird friends to arrive! It can take a few days for birds to get used to a new feeder, so remember to be patient. See below for more information on the postcard collection process! 🙂
👉How to Navigate App Features and Settings
👉Postcard (photos and videos) Collection Process
👉 More about our bird recognition model
Birdbuddy2
Step 3: Insert the camera module in the housing
Insert the camera into your feeder - it will turn on automatically and go into pairing mode when it clicks into place.
The camera module will blink blue and emit a beeping sound upon being inserted into the housing.
The location of the LED light can be seen below:
You then follow the steps in the app through Bluetooth and Wi-Fi pairing.
The camera will pair via Bluetooth automatically:
Then, select your Wi-Fi network and enter your Wi-Fi password. If the network is selected automatically, just put in the Wi-Fi password:
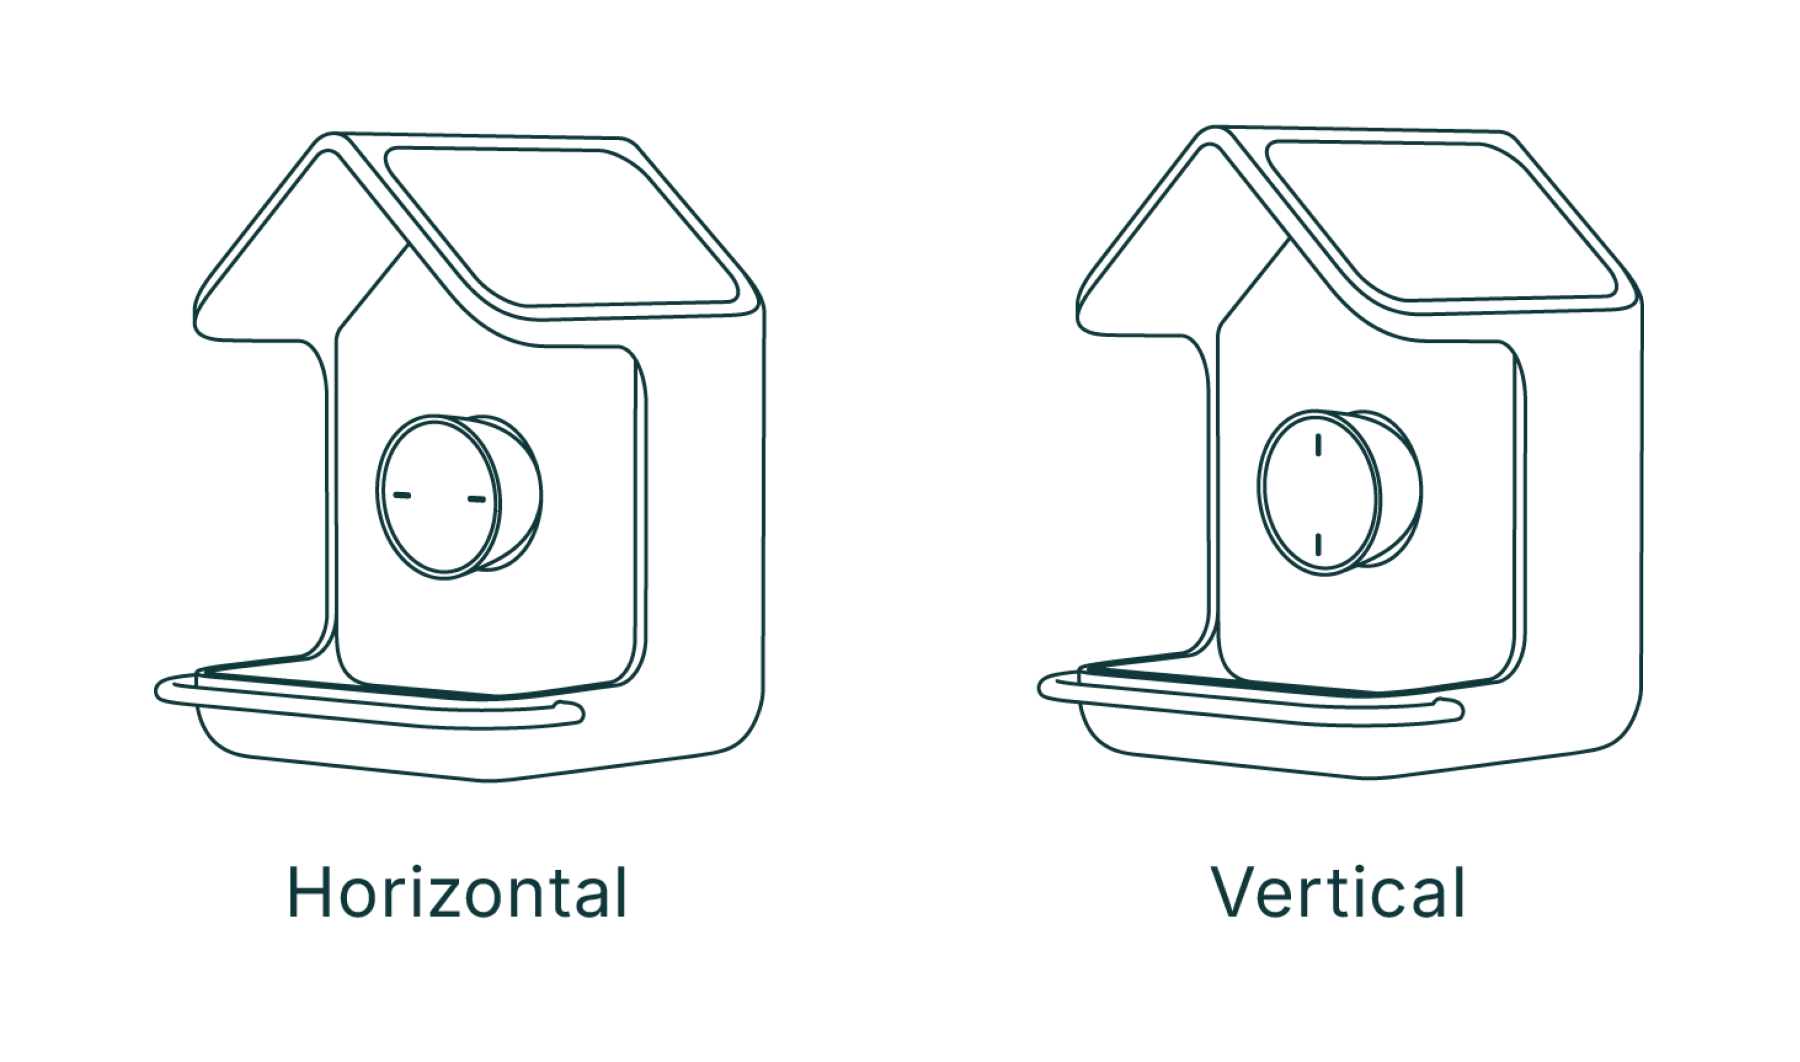
The Birdbuddy 2 camera module lets you easily switch between landscape and portrait views. The two slits (microphone and speaker) around the camera lens indicate the orientation. When the lines are vertical, the camera captures footage in vertical mode; when they are horizontal, the footage is captured in horizontal mode.
 Step 4: Live stream test
After successfully connecting to Wi-Fi, you will have the option to send an invite code to share the postcards your camera makes. Once this is completed or skipped, you will be directed to the Birdbuddy Live feature. Here, you can test the live stream even if the camera is not in its housing. If you find that the stream is not loading, please try reloading it.
Additionally, consult this article to see if your network settings might be interfering with the camera's functionality.
NOTE: Sound is not enabled on the live stream, even if you have sound recording turned on in the feeder settings. Only video postcards have sound.
Step 5: Place the Camera into the housing and take it outside
Once the camera module is paired and updated, you can place the camera into the feeder (if you have a Birdbuddy 2, you have already done so at step 3). You can check the live stream again to see if you're happy with the view.
Step 6: Fill Your Feeder!
Fill your feeder with seed. There are plenty of different varieties of seeds you can use, but we have some recommendations you can check out, too.
Step 7: Feeding Time!
Now it’s time to wait for some bird friends to arrive! It can take a few days for birds to get used to a new feeder, so remember to be patient. See below for more information on the postcard collection process! 🙂
👉How to Navigate App Features and Settings
👉Postcard (photos and videos) Collection Process
👉 More about our bird recognition model
More Help
If you have any questions or set up trouble at any time, feel free to look at our FAQ&Troubleshooting article or start a chat with us in the bottom right corner on our website or in the app under Support&Help. We’re always happy to help a fellow birder! 🕊️
Related to